Welcome on Board
Scroll down through "Getting Started → Core → Advanced";
the left menu stays with you—click any section to jump.
Ctrl+F search works too.
Scroll down through "Getting Started → Core → Advanced";
tap the breathing light in the top right to jump to any section.
GETTING STARTED
Opening VAS for the first time
After downloading from the App Store and opening VAS, you'll see a fresh floating toolbar on your desktop. It stays where you place it—drag it freely.

If the toolbar takes up too much space and you want it smaller—the breathing light mode is off by default. Turn it on manually in the toolbar's "Keyboard Shortcuts".

VAS also lives in your macOS menu bar, shaped like a bottle in the top-right corner of your screen.

Click the bottle in the top-right menu bar (left-click) to summon or fully hide the desktop toolbar—we've thought of everything for desk minimalists.
VAS remains on standby in your menu bar.
Permissions & privacy
When VAS takes its first screenshot, macOS will request screen recording permission—this is required of all screenshot tools on macOS. If you declined, go to System Settings → Privacy & Security → Screen Recording, enable VAS, then reopen it.
Tauri onlyUpgrading from the Electron version? macOS treats Tauri as a brand-new app — your previous screen recording permission won't carry over. Go to System Settings → Privacy & Security → Screen Recording, remove the old VAS entry, then take a screenshot with the Tauri version. macOS will prompt you to grant permission again.
Every screenshot, every OCR-recognized word, every QR code—processed entirely on your machine. Nothing uploaded, analyzed, or learned from. VAS has no server.
Taking your first screenshot
Press the VAS icon in the Dock or click the bottle in your menu bar—wherever VAS is, it appears before you, toolbar fully extended.
Choose a screenshot mode (full screen ⌘^1, window ⌘^2, rectangle ⌘^X), frame what you need—VAS brings it into the editor so you can continue weaving what words alone cannot hold.
Done editing? Drag it out to any window or document.
Three seconds. That's all.
CORE
One breathing light. One keystroke away.
When you're not using VAS but want it small and ready, turn on breathing light mode.
The toolbar collapses into a single 120×6px glimmer. Quiet. Unobtrusive. Waiting.
When you need it:
- AllDrag an image near—the toolbar opens like a Venus flytrap, catches what you're dragging. Release, and the image goes straight into the editor. If you were editing something else, it tucks that away and continues.
- Tauri onlyDrag an image out—the editor collapses like a black hole, freeing your full desktop and view to save or hand off. One-click drag to any window / dialog / folder. Release, and the editor unfolds to continue.
- Tauri onlyCopy a URL nearby—the light unfolds, toast appears: "Found ⟨URL⟩—click to capture." One click. Screenshot begins.
- Tauri onlyCopy an image from your browser—toast asks "paste image?" You confirm. Straight to the editor.
If you tuck VAS into a corner of your desktop and forget where it is—we know the breathing light is genuinely subtle—
Click the VAS icon in your Dock. Wherever it is, it unfolds into the toolbar, waiting for you.
Capture Toolbar
The floating toolbar that lives on your desktop
Editor Interface
The second main space after a screenshot. The editor is divided into four operational zones:
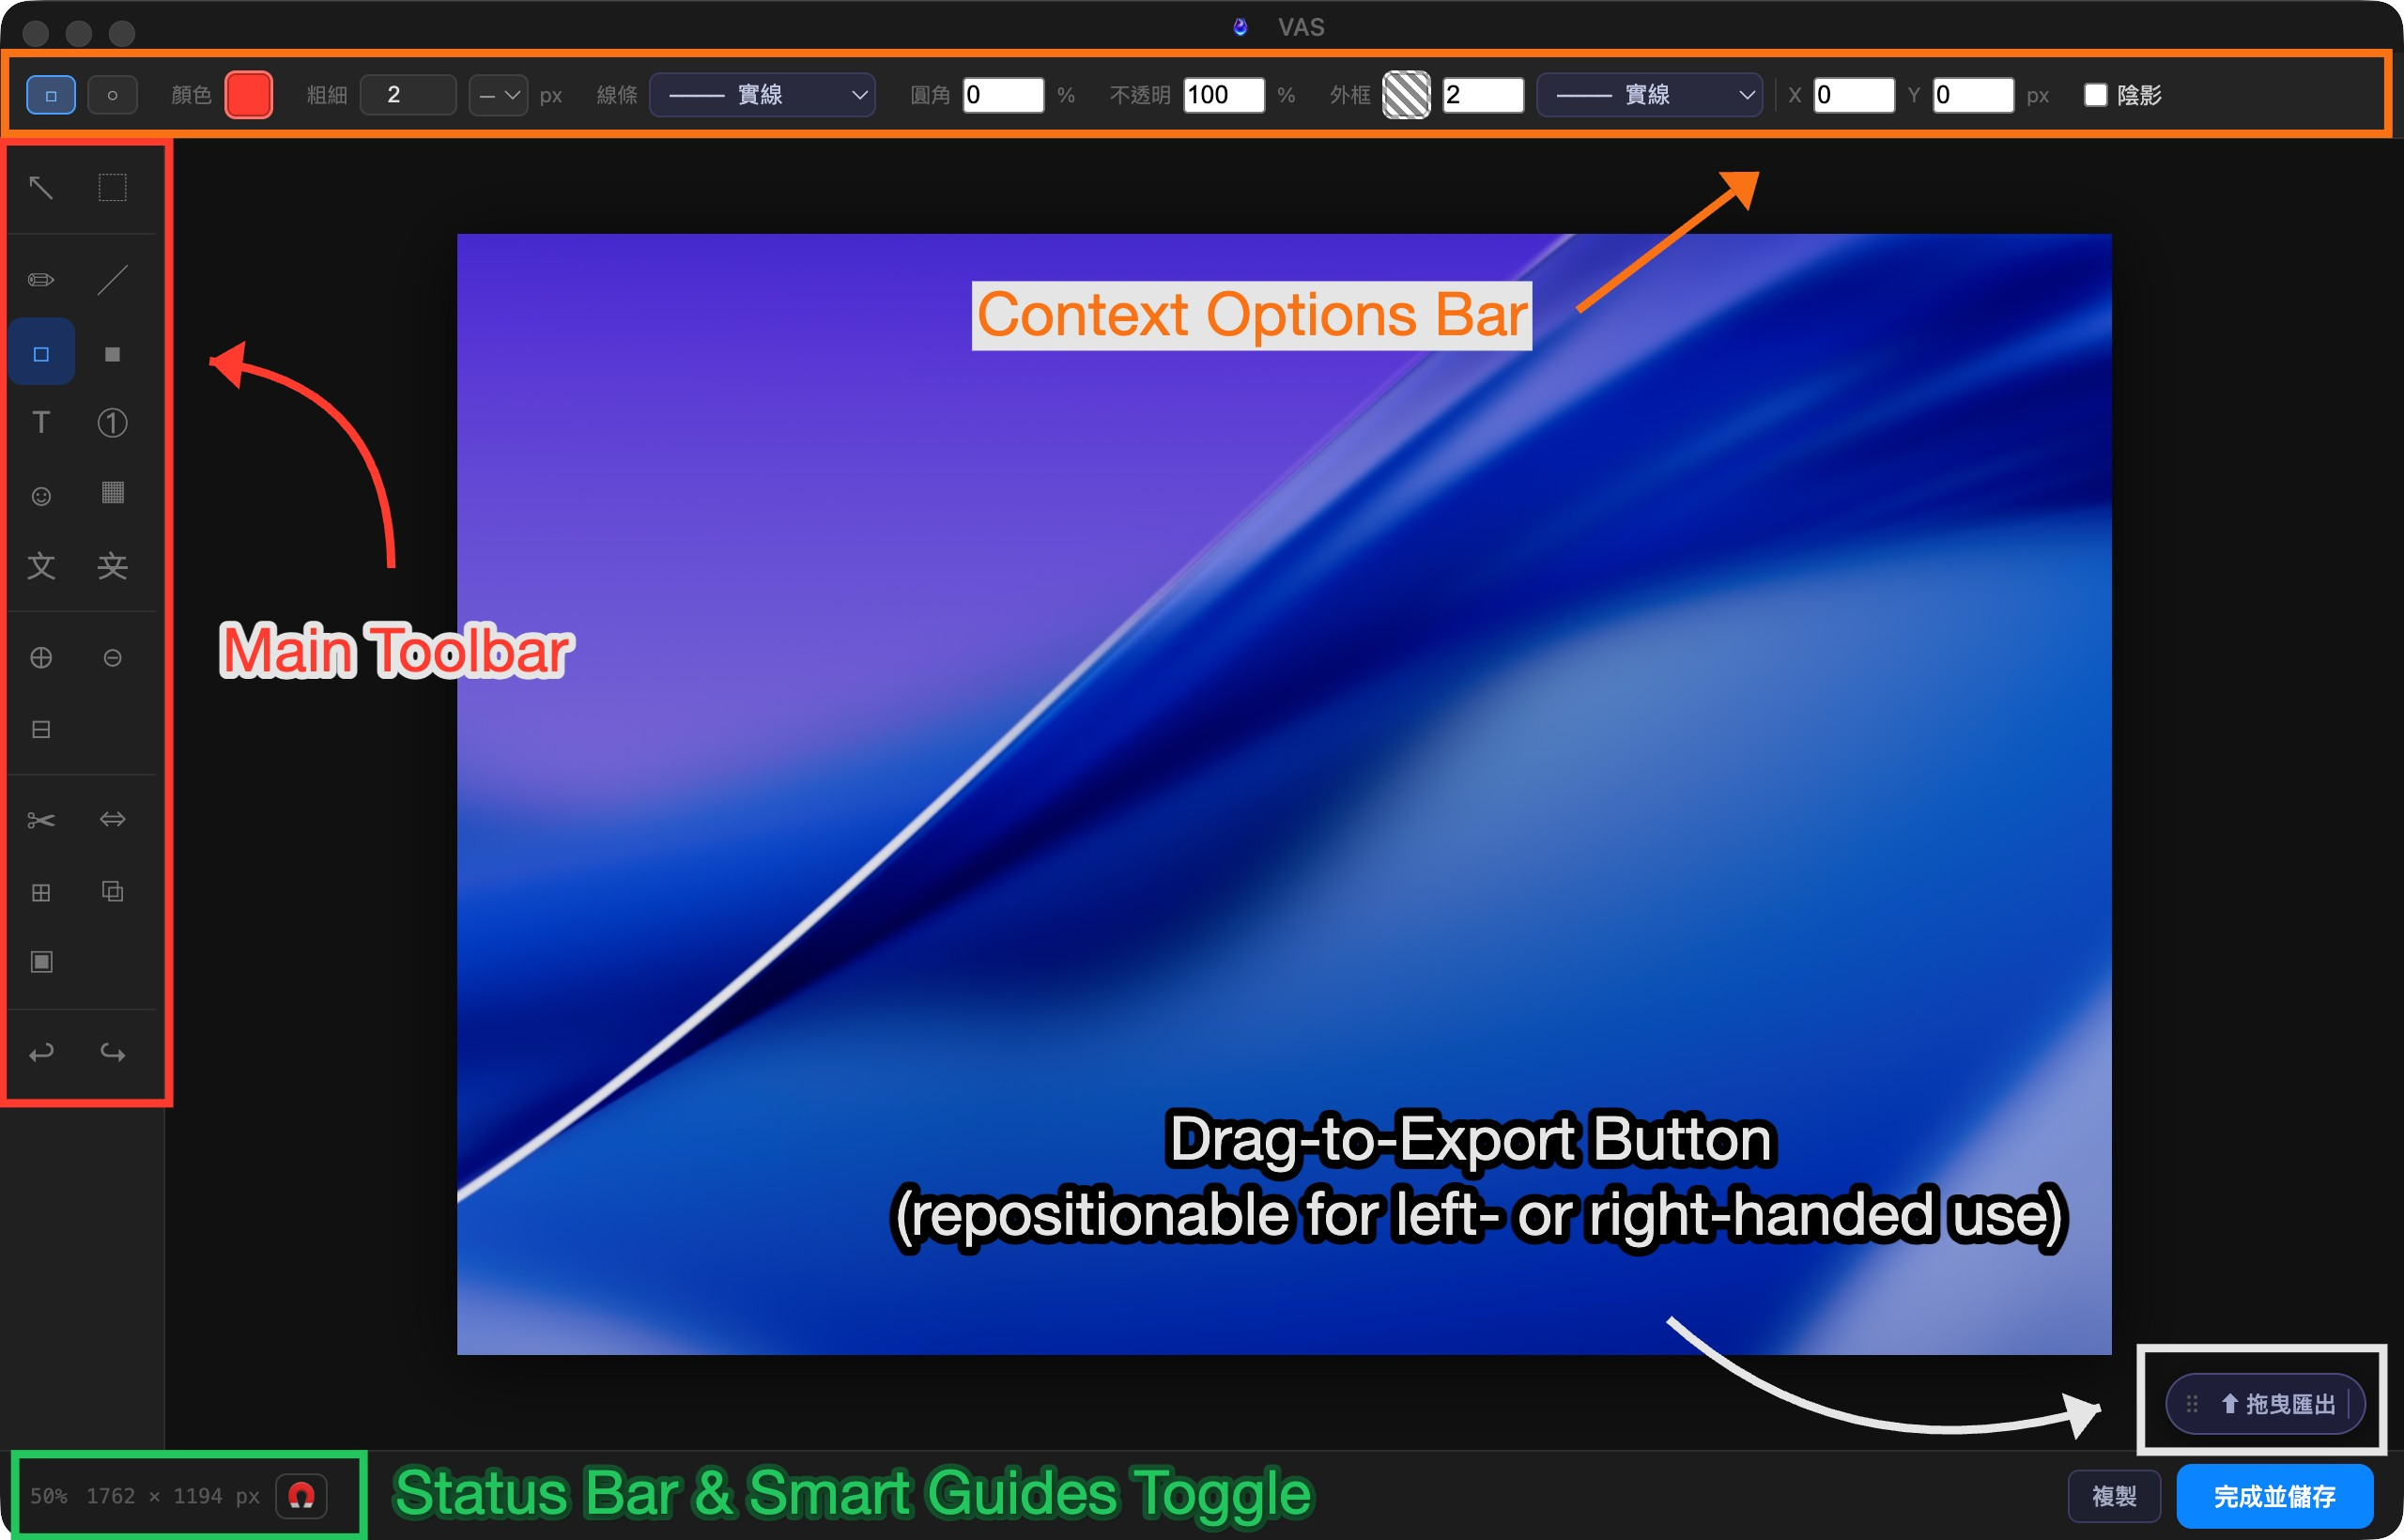
- Main Tool Menu——The vertical toolbar on the left. Select a tool to switch the canvas interaction mode. The active tool is highlighted in blue.
- Property Options Panel——The top toolbar. Updates dynamically based on the selected tool — adjust colour, stroke width, opacity, line style, and more.
- Floating Export Button——The floating button in the bottom-right corner. Drag it to reposition for left- or right-handed use. When finished, drag it to any target app to export. Tauri also offers a dedicated Sharesheet.
- Status Bar & Smart Guides Toggle——The status bar in the bottom-left corner. Displays current zoom level and canvas size, with a toggle to enable or disable smart magnetic snapping.
All annotation tools at a glance — keyboard shortcut in parentheses
Select
Draw
Annotate
Privacy & Masking
Canvas
Layout
Other
Export
When you're done editing, VAS gives you four exits:
- Drag out—pull the image straight from the editor to your desktop, Finder, Slack, anywhere that accepts images. No saving, no dialogs. Drag and it's gone.
- Copy to clipboard—press the Copy button, the image goes to your clipboard, then ⌘V it anywhere.
- Tauri onlyShareSheet—macOS native share panel. AirDrop, Messages, Mail, social media.
- Save—JPG / PNG / WebP / GIF / BMP / TIFF / PDF.
ADVANCED
Recipes
VAS keeps each tool small. One job each — but properties stack.
- Text × Fill → Highlighter
- Text × Transparent + Outline → Transparent text
- Border × Dashed + Weight → Review marker
- Line × Right-angle + Dashed → Flow connector
- Shape × Gradient + Low opacity → Fade mask
- Bubble × Mosaic → Comic-style meme
The combinations you invent are your own vocabulary.
→ Your Inside Language with VAS
OCR & QR Code
A screenshot doesn't always mean you're editing.
OCR · Text recognition
Recognized text goes straight to your clipboard by default. After the screenshot, ⌘V and paste anywhere.
Tauri onlyFor supported language markets, OCR applies localized privacy masking—
It recognizes local ID numbers, credit card numbers, and phone formats, applying appropriate handling during recognition.
QR Code · Scan
VAS decides what to do based on how much of the QR Code your frame contains:
- Fully framed—treated as intentional scanning. Opens the link directly.
- Loosely framed (partial)—asks you first: "Open this link?"
- Background element—no action. Screenshot goes straight to the editor.
Keyboard shortcuts
Built-in editor shortcuts, organized in four groups:
Tool switching
| 選取工具 | V |
| 框型選取 | M |
| 筆型工具 | P |
| 線條工具 | L |
| 矩形框 | R |
| 色塊 | B |
| 文字工具 | T |
| 編號標記 | N |
| 符號印章 | U |
| 馬賽克/模糊 | X |
| OCR 文字辨識 | G |
| 隱私遮蔽 | K |
| 裁切 | C |
| 調整大小 | S |
| 延伸畫布 | E |
| 疊入圖片 | O |
Canvas
| 放大 | ⌘ = |
| 縮小 | ⌘ - |
| 適合視窗 | ⌘ 0 |
| 平移畫布 | Space + 拖曳 |
| 切換磁吸對齊 | \ |
Edit
| 撤銷 | ⌘ Z |
| 重做 | ⌘ ⇧ Z |
| 複製 | ⌘ C |
| 貼上 | ⌘ V |
| 複製最終影像 | ⌘ ⇧ C |
| 全選 | ⌘ A |
| 刪除選取物件 | Delete / ⌫ |
Object
| 15° 鎖定旋轉 | Shift + 旋轉 |
| 等比縮放 | Shift + 拖曳角落 |
| 跳過磁吸 | Alt + 拖曳 |
| 微調 1 px | ← → ↑ ↓ |
| 微調 10 px | Shift + ← → ↑ ↓ |
| 結束折線繪製 | Double-click |
Custom settings
VAS intentionally offers few settings because we believe good tools get defaults right. What you can adjust:
- Show / hide desktop toolbar—left-click the bottle in the menu bar.
- Breathing light toggle—off by default. Enable it manually via "Keyboard Shortcuts" in the toolbar.
- Tauri onlyCustom keyboard shortcuts—the paid version lets you remap full-screen capture, window capture, rectangle capture, and paste image to whatever combinations feel native to you.
Key acceptance rules
| F1 … F12 | F keys (no modifier needed) |
| ⇧F5、⌘⌃A | Combinations with modifiers |
| A、1、X | Bare letters or numbers |
| ⌘Q、⌘W、⌘H、⌘, | System-reserved shortcuts |
| 單獨 ⌘ / ⌃ / ⌥ | Modifier keys alone |
Troubleshooting & edge cases
What kind of screenshot app is VAS?
VAS is a macOS screenshot and image-handling tool that bundles OCR, privacy redaction, QR Code scanning, point/line/area annotation, cropping, smart guideline layout, batch conversion, and watermarking — with full multi-display support. Two flavors: VAS Pro (Tauri · App Store · $9.99) and VAS Classic (Electron · Free).
What sets it apart from other screenshot tools: VAS is “a VAS built with VAS” — designed from the ground up for human-AI collaboration. Annotated screenshots can be handed straight to an AI to read, and anything you don't want feeding training data can be redacted in a single tap.
After upgrading to VAS Pro, VAS keeps asking for permissions — what do I do?
If you're moving from VAS Classic (Electron) over to VAS Pro (Tauri):
- Quit every copy of VAS (both Electron and Tauri builds) and uninstall the free version.
- Open System Settings → Privacy & Security → Screen & System Audio Recording.
- Find VAS in the list and hit the "−" button to remove the old permission.
- Reopen VAS Pro and tap "Full-screen capture" to trigger the system authorization prompt.
- The system will re-add VAS to the list, defaulting to off.
- Flip the toggle on, follow the prompt to quit and relaunch VAS, and you'll have full permissions.
Does VAS do web screenshots?
VAS Pro (Tauri · App Store · $9.99) supports web screenshots. Copy a URL, drag it onto the breathing light or toolbar, and VAS will ask whether you want a webpage capture; confirm, and VAS opens a browser in the background, captures the full page, and drops it straight into the editor for whatever comes next.
If the page you're after requires a login, we currently recommend grabbing it with a native browser extension (like FireShot), then tossing the result into VAS for post-processing.
Can I customize VAS's screenshot shortcuts?
VAS Pro (Tauri · App Store · $9.99) gives you four customizable shortcuts — full-screen capture, window capture, rectangle capture, paste image — so anyone migrating from another screenshot tool can keep the muscle memory they already have. VAS Classic (Electron · Free) ships with three fixed bindings (⌘^1 / ⌘^2 / ⌘^X).
Does VAS support multi-display workflows?
Yes. VAS supports multi-display workflows end to end, and leaves the choice in your hands:
- Press Enter — capture every display at once and output a single merged image
- Click any display — capture just that one, output separately
- Delayed capture mode — useful when you need to wait for a state to appear (such as hover effects); VAS figures out where you are and captures accordingly
Mixed-resolution setups (Retina alongside standard displays) get special handling too, so dimensions never end up out of sync.
This stubbornness has a backstory: VAS itself was built in a dual-display environment — its designer is a long-time dual-display user, so from day one, multi-display has never been a patch; it's been the default scenario.
How is VAS different from other Mac screenshot tools? When should I use VAS?
Grabbing a quick screenshot to share, jotting a note on it — macOS's built-in tool is plenty. Recording video, burst captures, building a user manual — Snagit / CleanShot X are the mature choices.
VAS solves a different problem — “human-AI collaboration.” When you need to hand a screen over to an AI to read, redact whatever shouldn't end up as training data, and keep the whole flow gliding like running water: this is the working ground VAS itself has been built and validated in since day one.
You wouldn't use VAS to replace Snagit, just as Snagit can't replace VAS.